Since I recently, as in last night, ran out of space on my blogger blog (this blog, the one right here, the one that you're reading now) I am MOVING MY BLOG. OH NO!!!!
It's not a big deal. However, I am moving to Wordpress because they offer 3 GB of space versus Blogger's 1 GB of space. That's three times the space for those of you un-fond of math! Really, really basic math!
The catch is that some stinker at wordpress already has my blog's name. And technically my place isn't even 650 square feet, it's actually like 645 square feet. WHOOPS. So anyway. I'm changing the name. For now it is going to be FRULOU. So my site is frulou.wordpress.com. This will be until I think of a better name, or until I get so used to that one that I decide to keep it! Kind of like how my parents feel about me! HA HA!


Wednesday, August 15, 2012
Tuesday, August 14, 2012
Rug Painting Progress
Remember 100 years ago two months ago when I posted about painting a rug I bought at Ikea? I've made progress.


Next I get to do the fun part, rip off the tape! Woo hoo! I'll be back tomorrow with the full tutorial and final reveal.

Taping is the lame part of the project for sure. I taped. I painted. I taped. I painted.

And then I finished! Well, I'm thisclose. I just have to go back and fill in any pesky little white spots where they're supposed to be coral.

Next I get to do the fun part, rip off the tape! Woo hoo! I'll be back tomorrow with the full tutorial and final reveal.
Thursday, August 9, 2012
My Favorite Blogs
I read blogs a lot. As in, every day, multiple times per day, all day long. I use Google Reader to keep up with my subscriptions. Here are a few of my favorites.
Comic - Hyperbole and a Half. She hasn't posted regularly (or at all) in ages, but her work is the epitome of funny to me. Her archives are worth a read for sure.
Cute - My Milk Toof. Follow the adventures of two clay teeth. For some reason that actually sounds kind of scary...but it's quite cute.
Corporate - A Bullseye View. Target's blog is the cream of the crop as far as corporate blogs go. Learn about Target's history, culture, and product design process.
Crafty Contractor - DIY Diva. Kit is my number one role model. This woman can do everything I dream of doing: re-roof a house, sand hardwood floors, build her own furniture, and more. She's amazing. She's also a licensed contractor in her state.
Cooking - ?
I'm still looking out for my favorite Cooking blog. I'm so picky with recipes I usually just come up with my own. I'd love to find a great cooking/baking blog to follow though (with a health conscious/sugar-alternative/vegan angle - see why I can't find one??). What are your favorite blogs?
Wednesday, August 8, 2012
Pumpkin Pie
At this point I haven't put much on the walls in my place, except three mirrors, my degree, and a cubby/organizer thing above my desk. But the weekend before last I went to my favorite vintage store, Feathers & Twigs. I found this awesome original painting of a little girl and her orange cat. It made me think of my kitty Pumpkin, that I lost almost exactly a year ago. Of course I took it home (for $6).
I wasn't crazy about the frame; it just wasn't chunky enough. Here's the painting with the original frame behind it:


Now I only have, like, a billion other spaces on the wall to fill. Yay!
I wasn't crazy about the frame; it just wasn't chunky enough. Here's the painting with the original frame behind it:

And the Virserum frame I picked up from Ikea (it also comes in dark brown and costs $10.99).

Of course, since it's from Ikea, there is some assembly required. All you have to do is install two little clips on the back and wrap the included wire around them. Then you can hang the picture from the wire. Easy.
 |
| Viserum Frame from Ikea |
Here's the painting on the wall. Of course the mat in the frame covers up some of the painting. But I still like the way it looks.

Oh yeah, and I put in the hallway. In case you couldn't tell! Every time I see it I think of Pumpkin, which is very nice.

Now I only have, like, a billion other spaces on the wall to fill. Yay!
Sunday, August 5, 2012
Dad's Kitchen, Part...Whatever I Lost Count
This is the end of the kitchen updates on my dad's house! Since I'm basically out of vacation time at work, there won't be anymore updates this year. Unless my dad transforms overnight into a DIYer. Not gonna happen.
I made sure to cover each piece in an adequate amount of glue - but not too much. I just went back and forth with the tube until there were multiple lines of glue covering the back about 2 inches apart.


Now my dad definitely needs a new microwave to match his awesome kitchen. Don't you think?!
I want to mention that I think this transformation will be a bit controversial. It was difficult to work with the state of the cabinets as they are. I couldn't do anything that would take more than a few hours, which obviously left me unable to work on the cabinets' finish or the countertops. My hope was to work off of the new oil-rubbed-bronze finishes in the kitchen and the deep red of the tile countertops. I hope you like it! I think it was a leap of faith, but in the end it works.
So first off, I want to mention the challenges of doing home improvement in Fairbanks, Alaska. It's not super challenging - don't get me wrong. There's a Home Depot and a Lowe's after all. But I am spoiled. I'm used to having over 10 convenient home improvement stores within a 10-15 mile radius of my condo in Atlanta. So, if I see something online and I want it for a project, I can pick it up somewhere and be back home in half an hour. Not so in Alaska. If they don't have something you need in stock it takes weeks (sometimes months) for them to order it and get it there. And this is even the case if you're willing to pay extra for expedited shipping. The piece I needed for this project was not available to be shipped to Alaska at all (even slowly). Which brings me to the specific challenge of this project. I had to leave it a TEENSY bit unfinished (sorry, dad), because the store was short one piece of backsplash. Whoops, I gave it away. I installed a kitchen backsplash! Anyway, I'll finish it up next time I'm in town.
I decided to install a kitchen backsplash because the wall was damaged a little behind my dad's stove. You can see what I mean in the picture below. I also mentioned it in this post about installing the lights in his kitchen earlier this year in March.

I didn't want to go with tile because it takes too long to install. I had a lot of work to do at the Comic Shop, and I was only there for a week. So I chose to install thermoplastic backsplash pieces with liquid nails. Here's what they look like. They're about $20 a piece at Lowe's. Liquid nails is only about $3.50 a tube and I used less than one tube.
 |
| Fasade 24-1/2-in Oil Rubbed Bronze Thermoplastic Multipurpose Backsplash |
My first step was to measure the area I wanted to cover - behind the stove up to the cabinets and underneath the cabinets along the wall, ending at the wall with the kitchen sink. Then I cut the pieces (one by one) and placed them up on the wall before I used the liquid nails, just to make sure I measured accurately. I didn't make any mistakes (besides being one sheet short!).
 |
| Adding Liquid Nails (I returned the extra tube for a refund when I was finished!) |
I made sure to cover each piece in an adequate amount of glue - but not too much. I just went back and forth with the tube until there were multiple lines of glue covering the back about 2 inches apart.
 |
| Sticking up the first piece of backsplash! |

I kept gluing and gluing. Cutting and cutting. Oh, and by the way, I used regular kitchen shears to do the job. Any scissors one step above simple paper cutting scissors would do the trick.
 |
| Cutting the backsplash |
 |
| Liquid nails on the backsplash |

 |
| Making progress! |
And now for the final before & after pictures. With knobs and pulls included!
 |
| Before... |
  |
| And After! |

 |
| With the new light fixture! |
Now my dad definitely needs a new microwave to match his awesome kitchen. Don't you think?!
I want to mention that I think this transformation will be a bit controversial. It was difficult to work with the state of the cabinets as they are. I couldn't do anything that would take more than a few hours, which obviously left me unable to work on the cabinets' finish or the countertops. My hope was to work off of the new oil-rubbed-bronze finishes in the kitchen and the deep red of the tile countertops. I hope you like it! I think it was a leap of faith, but in the end it works.
Saturday, August 4, 2012
Dad's Kitchen: Part II
Back in March when I visited my dad (before my last trip, which was at the beginning of July), I was on an oil-rubbed-bronze kick. And guess what? I'm not done yet. On my last visit in July I tackled even more parts of the kitchen. Last time, if you recall, I finished up new light fixtures, a new dishwasher, and a new kitchen sink faucet. However, there was one fairly sizable project that I didn't get around to doing. It might have been a lack of time, it also might have been my dad's credit card waking up in the middle of the night with cold sweats screaming, "Don't take me back to Lowe's!"
Here's the kitchen as I left it in March. Notice anything missing? I sure did...


I wanted to install kitchen knobs for the cabinets and pulls for the drawers! I would say "replace," but only two of the cabinets actually had knobs (the white kind pictured above). I headed to Lowe's to check out what I had to choose from.
Because I was already on my oil rubbed bronze kick (you can't stop me!) I went for the same color knobs and pulls. That way they would match the faucet and light fixtures. While at Lowe's, I first looked for the right color. Next I looked for an acceptable price. For knobs and pulls, $2 a piece is GREAT; five dollars is pushing it. Seven dollars is no-way-jose. I went with a simple bronze round knob, 1". At $2.47 a piece, they were right in budget.
So let's survey the kitchen pre-knobs. Here we have Hemingway investigating my supplies.


I take full responsibility for the mess on the counter. And don't worry - I didn't liquid nails any of the pulls on out of frustration (you can see some on the counter in the picture below). Ha ha. That's for the next part of part II of the kitchen upgrades. Make sense?

And there you have it. All done with pulls & knobs. Now the drawers and cabinets are easier to open, and they look much better! Believe it or not, I have another kitchen update to share with you before I show you the true "After" pictures of the kitchen. Stay tuned!
P.S. In case you're wondering, that was 22 knobs and 14 cup pulls total. Whew.
Here's the kitchen as I left it in March. Notice anything missing? I sure did...
Here's another shot of the kitchen that shows the new light fixture along with a white knob on the cabinet in the background. Did you figure it out yet?

I wanted to install kitchen knobs for the cabinets and pulls for the drawers! I would say "replace," but only two of the cabinets actually had knobs (the white kind pictured above). I headed to Lowe's to check out what I had to choose from.
Because I was already on my oil rubbed bronze kick (you can't stop me!) I went for the same color knobs and pulls. That way they would match the faucet and light fixtures. While at Lowe's, I first looked for the right color. Next I looked for an acceptable price. For knobs and pulls, $2 a piece is GREAT; five dollars is pushing it. Seven dollars is no-way-jose. I went with a simple bronze round knob, 1". At $2.47 a piece, they were right in budget.
 |
| Brainerd 1" Bronze Round Cabinet Knob from Lowe's |
So let's survey the kitchen pre-knobs. Here we have Hemingway investigating my supplies.

And my bags of hardware on the middle island.

Couldn't forget about the little cabinet hiding way up above the fridge!

Of course right when I began I made a mistake. Luckily I didn't get too far with it.

See how I made the knobs too low? Whoops! In the picture below, I'm holding the knob where it should be. So I pulled the knobs down, filled in the holes, and started over. The good thing about my dad being, how should I put this, much less DIY-inclined than I am, is that he doesn't care if I mess up. Whew.

After that setback, I started to make some progress. In the picture below you can see a comparison - one old white knob and one new bronze knob. (Along with the pretty new light fixture and faucet! Ahem.)

Here's an even better side-by-side comparison. Old. New.

The white knobs really looked odd in the kitchen. The bronze knobs help to tie in the deep red countertops.

And magically fast-forward to finished (at least with knobs)!

With all of the knobs in place, I was ready to move on to the more complicated part - drawers.
As you know from this post, I'm a huge fan of cup pulls for drawers. I have them in my own kitchen. They cost the same amount ($3-$5 each) as knobs, but they lend a lot more character to a space. They're more tricky to install though because you have to make sure the holes you drill are perfectly spaced. For a novice like me, it's a pain in the butt.
I picked out these Gatehouse 64mm Aged Bronze Arched Cabinet Pulls from Lowe's. They were only about $3.50 a piece, which is a great price for pulls.
 |
| Gatehouse 64mm Aged Bronze Arched Cabinet Pulls from Lowe's |
I take full responsibility for the mess on the counter. And don't worry - I didn't liquid nails any of the pulls on out of frustration (you can see some on the counter in the picture below). Ha ha. That's for the next part of part II of the kitchen upgrades. Make sense?

I was seriously happy to be done with the pulls. Sooooooo happy.

And there you have it. All done with pulls & knobs. Now the drawers and cabinets are easier to open, and they look much better! Believe it or not, I have another kitchen update to share with you before I show you the true "After" pictures of the kitchen. Stay tuned!
P.S. In case you're wondering, that was 22 knobs and 14 cup pulls total. Whew.
Thursday, August 2, 2012
Little Johnstone
This past weekend I was going through some old pictures that I found under my bed (during the big organization project I wrote about briefly here and that I will write about in detail later) and I found one that I particularly love. I picked up this black frame at Target to put it in.
 |
| Target Black Frame 5x7 - $9.99 |
I decided to put it next to the TV on the new media console.


Can you see who is in the photograph yet?


The photo is of me, my Grammie, Uncle Don, and my brother in the foreground being very pouty. I love this picture. He was probably a little upset because the mosquitoes were so bad. I vaguely remember this day. Notice I have a mosquito hat on, so I'm all smiles. We were trekking around Little Johnstone Bay in Alaska where my Uncle Don has a cabin. I don't remember who took this photo, but I'm sure someone in my family knows.
Monday, July 30, 2012
Birthdays, Kittens, & Ponies
Been busy with finals at school. I know, I know. You're like, again?! But yes. Finals come but once three times a year. Blah! I love my classes though. Economics and a seminar in advanced accounting.
I have lots of stuff to share with you. I have more art on the walls, some kitchen updates, a HUGE storage/organization project, plus I have to cover all of the projects I completed at my dad's house over the fourth of July. Oh, and my dad got his home movies back on DVD! Shh, it's a secret. He's going to send him to his brother and sister-in-law as a surprise (please don't tell). He's just going to mail them the DVDs without any explanation. Cool, right? Here's a sneak peak, but sorry - no videos yet!
When I get the digital copies I'm going to edit them and add music. It's about 90 minutes worth and almost exactly half are in color - the others in black and white. I never met my grandma on my dad's side, so it's so surreal to see her walking around in a video. It's amazing.
I have lots of stuff to share with you. I have more art on the walls, some kitchen updates, a HUGE storage/organization project, plus I have to cover all of the projects I completed at my dad's house over the fourth of July. Oh, and my dad got his home movies back on DVD! Shh, it's a secret. He's going to send him to his brother and sister-in-law as a surprise (please don't tell). He's just going to mail them the DVDs without any explanation. Cool, right? Here's a sneak peak, but sorry - no videos yet!
 |
| Driving the Car |
 |
| Birthday Party! |
When I get the digital copies I'm going to edit them and add music. It's about 90 minutes worth and almost exactly half are in color - the others in black and white. I never met my grandma on my dad's side, so it's so surreal to see her walking around in a video. It's amazing.
Tuesday, July 17, 2012
iPhone 4S Wide-Angle (Fisheye) Lens Review
When the airbnb professional photographer stopped by a few months ago to take pictures of my place, he brought a fancy camera that took wide-angle shots. It made the condo look a lot more inviting. The only camera I use anymore is my iPhone 4S camera, so I decided to try out a mini fisheye lens from Amazon, just to see how it would work. I picked the Detachable 0.67X Wide Angle Macro Lens for Apple iPhone, iPod Nano 5, Camera Phones (Camera Lens Smaller than 9.5mm) .
.


As you can see, there's a lot more in the frame. Here's another example, using my homework sitting on the dining room table:
And again, with the "without lens" picture on top and the "with lens" picture on the bottom:

Pretty cool, huh? Notice that in the "With Lens" bathroom pictures you can see the light fixture and all the way up to the ceiling! You can really fit a TON more space in the frame.
At only $5 I think it's a pretty remarkable little doodad and I'm glad I purchased it. The inconvenience of having to take my phone out of its case and affix the little lens to the back is annoying, but when I want a wide-angle photo, totally worth it. I'll definitely be using this lens to take any future airbnb pictures I need.
I haven't tried out the macro (Macro is for taking clear pictures of close-up details.) part of the lens yet, but when I do I'll post a review of that too.
It's tiny and comes with a wide angle lens and a macro lens that are connected. It also comes with a few little sticky-backed rings that attach to the lens magnetically. The rings don't stick to the phone very well - that's my only complaint about the product, actually. You could fix that by using some superglue. I didn't because I don't want the ring on my phone permanently.

The lens comes with a detachable cover and cord (I guess so you could use it as a cell phone charm if you wanted to). I've also heard of people hanging the lens on necklaces so they have it with them all of the time.


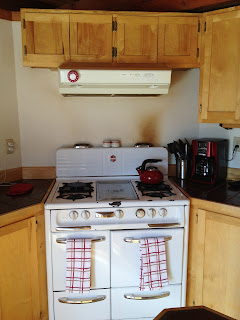
Check out this picture of the kitchen:
 |
| Without Lens |
Next I stood in the exact same place (with my back up against the windows behind the dining table) and took a picture with the lens.
 |
| With Lens |
 |
| Without Lens |
 |
| With Lens |
And again, with the "without lens" picture on top and the "with lens" picture on the bottom:

You can really see the difference, right? And my final example, the bathroom:
 |
| Without Lens |
 |
| With Lens Just Outside Bathroom Door |
 |
| With Lens Just Inside Bathroom Door |
Pretty cool, huh? Notice that in the "With Lens" bathroom pictures you can see the light fixture and all the way up to the ceiling! You can really fit a TON more space in the frame.
At only $5 I think it's a pretty remarkable little doodad and I'm glad I purchased it. The inconvenience of having to take my phone out of its case and affix the little lens to the back is annoying, but when I want a wide-angle photo, totally worth it. I'll definitely be using this lens to take any future airbnb pictures I need.
I haven't tried out the macro (Macro is for taking clear pictures of close-up details.) part of the lens yet, but when I do I'll post a review of that too.
Subscribe to:
Posts (Atom)