Kitchen Living Room
Showing posts with label alaska. Show all posts

Sunday, August 5, 2012

Dad's Kitchen, Part...Whatever I Lost Count

This is the end of the kitchen updates on my dad's house! Since I'm basically out of vacation time at work, there won't be anymore updates this year. Unless my dad transforms overnight into a DIYer. Not gonna happen.

So first off, I want to mention the challenges of doing home improvement in Fairbanks, Alaska. It's not super challenging - don't get me wrong. There's a Home Depot and a Lowe's after all. But I am spoiled. I'm used to having over 10 convenient home improvement stores within a 10-15 mile radius of my condo in Atlanta. So, if I see something online and I want it for a project, I can pick it up somewhere and be back home in half an hour. Not so in Alaska. If they don't have something you need in stock it takes weeks (sometimes months) for them to order it and get it there. And this is even the case if you're willing to pay extra for expedited shipping. The piece I needed for this project was not available to be shipped to Alaska at all (even slowly). Which brings me to the specific challenge of this project. I had to leave it a TEENSY bit unfinished (sorry, dad), because the store was short one piece of backsplash. Whoops, I gave it away. I installed a kitchen backsplash! Anyway, I'll finish it up next time I'm in town. 

I decided to install a kitchen backsplash because the wall was damaged a little behind my dad's stove. You can see what I mean in the picture below. I also mentioned it in this post about installing the lights in his kitchen earlier this year in March. 


I didn't want to go with tile because it takes too long to install. I had a lot of work to do at the Comic Shop, and I was only there for a week. So I chose to install thermoplastic backsplash pieces with liquid nails. Here's what they look like. They're about $20 a piece at Lowe's. Liquid nails is only about $3.50 a tube and I used less than one tube.

Fasade 24-1/2-in Oil Rubbed Bronze Thermoplastic Multipurpose Backsplash

My first step was to measure the area I wanted to cover - behind the stove up to the cabinets and underneath the cabinets along the wall, ending at the wall with the kitchen sink. Then I cut the pieces (one by one) and placed them up on the wall before I used the liquid nails, just to make sure I measured accurately. I didn't make any mistakes (besides being one sheet short!). 

Adding Liquid Nails (I returned the extra tube for a refund when I was finished!)

I made sure to cover each piece in an adequate amount of glue - but not too much. I just went back and forth with the tube until there were multiple lines of glue covering the back about 2 inches apart.

Sticking up the first piece of backsplash!


I kept gluing and gluing. Cutting and cutting. Oh, and by the way, I used regular kitchen shears to do the job. Any scissors one step above simple paper cutting scissors would do the trick. 

Cutting the backsplash

Liquid nails on the backsplash


Making progress!

And now for the final before & after pictures. With knobs and pulls included! 

Before...


And After!


With the new light fixture!

Now my dad definitely needs a new microwave to match his awesome kitchen. Don't you think?!

I want to mention that I think this transformation will be a bit controversial. It was difficult to work with the state of the cabinets as they are. I couldn't do anything that would take more than a few hours, which obviously left me unable to work on the cabinets' finish or the countertops. My hope was to work off of the new oil-rubbed-bronze finishes in the kitchen and the deep red of the tile countertops. I hope you like it! I think it was a leap of faith, but in the end it works. 

Saturday, August 4, 2012

Dad's Kitchen: Part II

Back in March when I visited my dad (before my last trip, which was at the beginning of July), I was on an oil-rubbed-bronze kick. And guess what? I'm not done yet. On my last visit in July I tackled even more parts of the kitchen. Last time, if you recall, I finished up new light fixtures, a new dishwasher, and a new kitchen sink faucet. However, there was one fairly sizable project that I didn't get around to doing. It might have been a lack of time, it also might have been my dad's credit card waking up in the middle of the night with cold sweats screaming, "Don't take me back to Lowe's!"

Here's the kitchen as I left it in March. Notice anything missing? I sure did...


Here's another shot of the kitchen that shows the new light fixture along with a white knob on the cabinet in the background. Did you figure it out yet? 


I wanted to install kitchen knobs for the cabinets and pulls for the drawers! I would say "replace," but only two of the cabinets actually had knobs (the white kind pictured above). I headed to Lowe's to check out what I had to choose from.

Because I was already on my oil rubbed bronze kick (you can't stop me!) I went for the same color knobs and pulls. That way they would match the faucet and light fixtures. While at Lowe's, I first looked for the right color. Next I looked for an acceptable price. For knobs and pulls, $2 a piece is GREAT; five dollars is pushing it. Seven dollars is no-way-jose. I went with a simple bronze round knob, 1". At $2.47 a piece, they were right in budget.

Brainerd 1" Bronze Round Cabinet Knob from Lowe's

So let's survey the kitchen pre-knobs. Here we have Hemingway investigating my supplies.


And my bags of hardware on the middle island. 


Couldn't forget about the little cabinet hiding way up above the fridge!


Of course right when I began I made a mistake. Luckily I didn't get too far with it.


See how I made the knobs too low? Whoops! In the picture below, I'm holding the knob where it should be. So I pulled the knobs down, filled in the holes, and started over. The good thing about my dad being, how should I put this, much less DIY-inclined than I am, is that he doesn't care if I mess up. Whew.


After that setback, I started to make some progress. In the picture below you can see a comparison - one old white knob and one new bronze knob. (Along with the pretty new light fixture and faucet! Ahem.)


Here's an even better side-by-side comparison. Old. New.


The white knobs really looked odd in the kitchen. The bronze knobs help to tie in the deep red countertops. 


And magically fast-forward to finished (at least with knobs)!


With all of the knobs in place, I was ready to move on to the more complicated part - drawers.

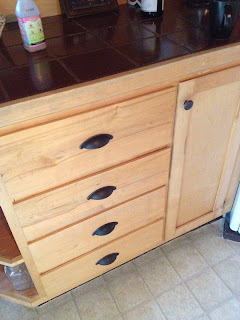
As you know from this post, I'm a huge fan of cup pulls for drawers. I have them in my own kitchen. They cost the same amount ($3-$5 each) as knobs, but they lend a lot more character to a space. They're more tricky to install though because you have to make sure the holes you drill are perfectly spaced. For a novice like me, it's a pain in the butt. 

I picked out these Gatehouse 64mm Aged Bronze Arched Cabinet Pulls from Lowe's. They were only about $3.50 a piece, which is a great price for pulls. 

Gatehouse 64mm Aged Bronze Arched Cabinet Pulls from Lowe's

I take full responsibility for the mess on the counter. And don't worry - I didn't liquid nails any of the pulls on out of frustration (you can see some on the counter in the picture below). Ha ha. That's for the next part of part II of the kitchen upgrades. Make sense?


I was seriously happy to be done with the pulls. Sooooooo happy.


And there you have it. All done with pulls & knobs. Now the drawers and cabinets are easier to open, and they look much better! Believe it or not, I have another kitchen update to share with you before I show you the true "After" pictures of the kitchen. Stay tuned!

P.S. In case you're wondering, that was 22 knobs and 14 cup pulls total. Whew.

Wednesday, July 11, 2012

Super 8

I realized a few days ago that I forgot to mention one of the projects I tackled on my last Alaska trip earlier this month. My dad has been storing a set of 30 film reels from the 1950s-1960s for decades. I got them out, dusted them off, labeled them carefully, and shipped them off to homemoviedepot.com to be converted to a digital format. I can't speak to how good that service is yet, because it takes them up to three weeks to finish. I ordered DVDs for my dad and a Mac compatible flash drive with digital copies so I can burn him additional copies easily.

Organizing the tapes was difficult because the only really reliable source of information on what they contained was from handwriting on the film reel boxes - and some of the boxes were blank with no notes. So I tries to go off of the development dates and the style of the boxes. You can see how Kodak evolved its box style over the years in the picture below!

8mm Film Collection

I am really excited to see all of the home movies, but a few reels really caught my eye. Some of them feature one of my dad's family cabins out in the woods of Arkansas, and my dad has so many stories of how magical it was that I can't wait to see it myself! It sounds like an awesome summer camp. Another reel was labeled "Six Flags" which just sounds too cool. Six Flags 40+ years ago?! Awesome.

When my dad gets the movies back I will let you know how it all turns out.

Saturday, July 7, 2012

Lists are Fun

Today is my last day in Alaska, and I've gotten a ton of stuff done for my dad. Here are some lists of what I've accomplished over the past week:

House Stuff (although some of it is work stuff too):
  • Installed Apple TV with login to Netflix for streaming movies and TV shows
  • Signed up for faster internet speed
  • Signed up for an Apple iTunes account for buying apps on iPhone
  • Resolved voicemail password issue
  • Organized contacts and account information in iPhone
  • Created online banking accounts
  • Setup a mint.com financial account
  • Installed cup pulls and knobs in the kitchen (22 drawers and 15 doors)
  • Installed a kitchen backsplash
  • Refinanced mortgage
  • Purchased new stainless steel garbage can for kitchen/moved old garbage can to laundry room
  • Organized part of the garage/threw away three car loads of boxes/garbage
  • Vacuumed
  • Moved books to upstairs library
  • Sewed patches onto three pairs of pants and new buttons onto one shirt
  • Ordered three new shirts from J. Crew and bought some clothes in town (for dad)
  • Hung up house numbers on tree at the beginning of the driveway
  • Covered up "Keep Out" sign with a much nicer sign (also at the beginning of the driveway)
Work Stuff:
  • Setup new point of sale computer
  • Setup point of sale area with backup battery surge protector and cord cover (no tripping!)
  • Put together desk in new office
  • Setup computer in new office
  • Assembled shelving
  • Cleaned and organized
  • Organized gift and card for an employee leaving the state
Now I am super tired and I hope I can sleep on the plane. I get back home tomorrow morning and then I have work on Monday. School on Wednesday. Back to it.

Thursday, July 5, 2012

House Numbers

I'm back in Alaska this week helping out at my dad's house and his store.

I braved the swarms of mosquitoes to put up new house numbers at the beginning of his driveway. There was a tiny, little sign with numbers, but it was difficult to see. The numbers are from Lowe's and were about $3.50 a piece.


First I found a good tree that was visible from the road.  


I gathered all of my supplies.


And I nailed up each number with two nails a piece. 


Here's what they look like from the road, as if I were in a car. 

Now package deliverers and other visitors will find the house more easily. Mission accomplished. 

Tuesday, April 10, 2012

Dad's Loft/Office/Library Before & After

This is part of a series on my dad's house in Alaska. Read more here. I'll resume 650 square feet posts on my condo when the series is complete.


Let's visit the loft space of my dad's house! To me this is the coolest room. My dad had these really old Lord of the Rings posters from the 1970s just hanging out all rolled up in a closet somewhere. I pulled them out (at his request) and put them in these great, inexpensive frames from Walmart.

Mainstays 24x36 Wide Poster Frame, Black

I tried putting one on the wall here:


But then I realized it would become sun-bleached so I moved it to the stair well. Here's another poster at a different part of the stair well:


And another further down the stairs:


This one is my favorite. These posters are awesome. Like, dad I'm gonna steal them from you awesome.


I grabbed a smaller frame for this Captain America print (notice the light shade hasn't been changed out yet):


Which was perfect for the room chock full of comics. Luckily, Grammie helped me organize them. 


But, before we get to the comics and bookshelves, let's check out the desk. Looking tidy, right?


The new Mad Men desktop background.


And a view of the calendar my boyfriend gave my dad last year.


This is the light shade I decided to use up there. I didn't spray paint these fellas because they're on a separate floor from the living room and I ran out of time. At least everything's consistent within the various rooms. 


Here's a sort of "during" picture:


And here's the main room after all of the organizing was done. Can you believe that is only a fraction of my dad's books and comics? He has the best collection of anyone I know.


Grammie carefully filled up this vintage comic rack with comic books. My dad said this was the exact same kind of comic rack he used to buy comics off of when he was a kid!


On the side of the room opposite from the bookshelf/office room, I setup a reading area at my dad's request. We carried that chair up the stairs ourselves. Ugh.


This is the table I used from Walmart. It doesn't get great reviews, but I thought it was awesome. The drawer works well, too.

Mainstays Cardinal Hill Side Table, Hazelwood

I also added this pharmacy-style floor lamp. I have no idea what pharmacy-style means, but I have a lamp just like this in my house. I like the shape and color.

Here's my dad and Sitka enjoying the area:


Now, dad, all you have to do is actually READ all of those comics. Um...yeah, see you in 100 years!